


 Title Index
 Recently Changed
 Page Hierarchy
 Incomplete
 Tags
Tags


Note: if you are not already familiar with the basics of the FuneralTech CMS, please read the article 'Basic CMS Overview for Skin Editors'.
Overview
A skin is a structured collection of HTML and CSS files that defines the overall layout and appearance of a site. Each FuneralTech CMS site has a skin assigned to it. As a skin contractor, your job is to take a design that is assigned to you, and to produce a skin that matches the provided design as closely as possible. Designs will either come in the form of PSD files, or in the form of an example website.
Please download the following files before proceeding: BaseTemplate.zip Responsive-1.zip
BaseTemplate.zip above is a basic template that can be used when creating new skins. Responsive-1.zip is an example of a skin that is used in production by our clients (for example, see http://dartefuneralhome.com/). Please note that these zip file are already in the necessary format for uploading to the Deployment Manager.
Browser Compatibility Requirements
Skins must render correctly in the following environments:
- Internet Explorer 9 and above
- The most recent release of Firefox
- The most recent release of Chrome
- The most recent release of Safari
- Android phones
- iPhones
- iPads
- Android tablets
- Windows tablets
For IE8, the site must function correctly, but the appearance of the site does not need to be perfect.
IE7 and below are completely unsupported. Do not worry about these at all.
Responsive Design Requirements
Skins must render in an aesthetically pleasing manner at any horizontal resolution above 340px. Here are a couple of basic guidelines for responsive design:
-
At 1023px and below, the navigation menu at the top should be changed into a drop-down button that is clicked.
- There is a small script block embedded in the HTML skin files that handles this button. This script block is included in the base template.
- At 767px and below, any multi-column content should be changed into single-column content that fills the entire width of the screen.
It may also be necessary to add other small tweaks to site content in order to get things to render nicely.
Please see the Darte Funeral Home site for an example of responsive design in action.
Skins, Theme Packs, and Themes
As stated above, a skin is a structured collection of HTML and CSS files that defines the overall layout and appearance of a site.
Skins are divided into one or more theme packs, each of which contains one or more themes.
A theme is a CSS file that overrides some of the visual styling of a skin. A theme does not modify the layout of a skin - it only modifies colors and images.
A theme pack is a collection of one or more themes. A skin must have at least one theme pack, but may have more.
A site must have both a skin and a theme selected. In the base template above, there is a single theme pack, with a single theme.
Skin File Structure
Skins files are organized in the following file structure:
-
html/
- index.html
- inside-page.html
- widget-page.html
-
css/
- skin.css
- layout-styles.css
- responsive.css
- normalize.min.css
- fonts/
- images/
-
themes/
- css/
- previews/
- thumbs/
- skin.json
html/
These files define the overall layout of home pages (index.html), inside pages (inside-page.html), and widget pages (widget-page.html).
These also define any placeholders that are used by the site. Placeholders are HTML tags that are populated with content that comes from the FuneralTech CMS. Placeholders come in three main types:
-
Design placeholders
- These placeholders contain content that can be edited through the 'edit design' section of the site editor.
-
Main content placeholder
- This placeholder contains content that can be edited through the 'edit page' section of the site editor.
- There can only be a single main content placeholder for each page type.
-
Reserved placeholders
- These placeholders contain content that is not editable through the site editor.
- The navigation links at the top of a page is an example of a reserved placeholder.
- The list of deceased persons on most home pages is another example of a reserved placeholder.
A placeholder is created by adding the attributes 'cmsPlaceholderType' and 'cmsPlaceholder' to a standard HTML tag. The inner content of the tag will be automatically populated by the CMS.
-
cmsPlaceholderType
- This must have the value "site" for design & main content placeholders
- This must have the value "reserved" for reserved placeholders
-
cmsPlaceholder
- For design placeholders, this must be a unique (within the HTML file) name for the placeholder. This name must not be "content" or "title".
- For the main content placeholder, this must be have the value "content".
-
For reserved placeholders, this contains the type of reserved placeholder to insert.
-
"tribute" - creates a list of recently deceased persons.
- This CSS class of the placeholder element should either be 'arrangement-vertical' for a vertical list, or 'arrangement-thumbs' for a horizontal list of thumbnails.
- "dropdownNavigation" - creates a drop-down navigation menu that contains all pages in the site
- "navigation" - creates a navigation menu that contains only the main pages in a site.
-
"secondaryNavigation" - Creates a navigation menu for child pages the current page.
- This is often used on the inside pages of new skins.
-
"tribute" - creates a list of recently deceased persons.
When you are creating a design placeholder for text, make sure to add CSS classes to style the text to match your source design.
If a design placeholder is intended to hold an image, then you will need to set a 'content-type="image"' attribute on the placeholder.
There is one special case placeholder - a placeholder with a cmsPlaceholderType of 'site' and a cmsPlaceholder of 'title' will be automatically filled out with the title of the page. This is used in conjunction with the 'title' tag in the 'head' tag of the HTML file.
Look at the placeholders in the base template for examples.
css/
There are four CSS files contained within this directory, which define the appearance of the skin.
-
skin.css
- This defines the overall appearance of a skin. Fonts, colors, background images, position tweaks, and size tweaks are controlled in this file.
- This includes the appearance of content that goes into reserved placeholders.
-
layout-styles.css
- This file primarily defines the size, padding, and margin of the structural CSS classes used for the site layout
- The sizes of the main content placeholders are defined in this file
-
The structural CSS classes used by the HTML files to define the overall layout of a site are also defined in this file
- For example, the CSS class '.two-thirds' styles an element to float left, and to have a width equal to two-thirds of the available space.
-
responsive.css
- This file controls how the skin looks when viewed at lower resolutions.
- Once the horizontal resolution drops below 1024px, dropdown menus are replaced with a button that opens a list of pages
- Once the horizontal resolution drops below 768px, all of the multi-column content in a site is changed to instead be stacked vertically.
- Any additional tweaks that are needed to make things look good at lower resolutions also go in here.
- Try navigating to http://dartefuneralhome.com/ and resizing your browser window to see an example of this file in action.
-
normalize.min.css
- This file contains a set of definitions that makes the default appearance of HTML elements common between all browsers.
- You should never have to edit this file. It should be the same between all skins.
css/fonts/
Any fonts needed by the skin should go into this directory.
images/
Any images needed by the skin go into this directory.
themes/
Skin theme files go into this directory.
themes/css/
For each theme in the skin, there needs to be a single CSS file here named <theme-id>.css (theme IDs are defined in the 'skin.json' file).
themes/previews/
For each theme in the skin, there needs to be a single JPG preview here, named <theme-id>-preview.jpg. These images provide an example of what a site will look like when using the theme.
Do not use PNG images for previews.
themes/thumbs/
For each theme in the skin, there needs to be a single JPG thumbnail here, named <theme-id>.jpg. These images provide a thumbnail-sized version of the previews above.
Do not use PNG images for thumbnails.
skin.json
This file defines the name of a skin, the theme packs within the skin, and the themes within each theme pack. If you are familiar with JavaScript, then the layout of this file should be fairly straightforward.
Note that the 'id' for themes should be unique for each theme in the skin. Do not worry about the 'publiclyAvailable' setting - just set it to true.
Creating a Skin
Before You Begin
When you are assigned a skin, make sure you have been given the following pieces of information:
-
The design you will base your skin on
- This will either be a PSD file, or a website
- The name of the skin
- A list of elements in the design that should be implemented as placeholders that can be edited through the site editor.
- A site to work with (contractor1.twintiers.ca, contractor2.twintiers.ca, etc).
- The username and password for the deployment manager
- The username and password for the site you are assigned
Getting Started
First, copy the files from the base template above to a new directory, and name the directory after the name of the skin.
Next, edit the skin.json file. There are a few things you will want to edit here:
- The skin name ("Base Template" by default. Change this to '<skin name> - <your name>')
- The skin pack name ("Base Template Skin Pack 1" Change this to '<your name> <skin name> Skin Pack 1')
- The theme ID ("black-brown"). Pick a name for this that roughly matches the color scheme of the skin.
- The theme name ("Black/Brown")
- The cssFile, thumbnail, and previews (to match the theme ID above)
For example, if your name was "John Smith", and your skin name was "Mystery", then you would set the skin name to 'John Smith Mystery", and the skin pack name to "John Smith Mystery Skin Pack 1".
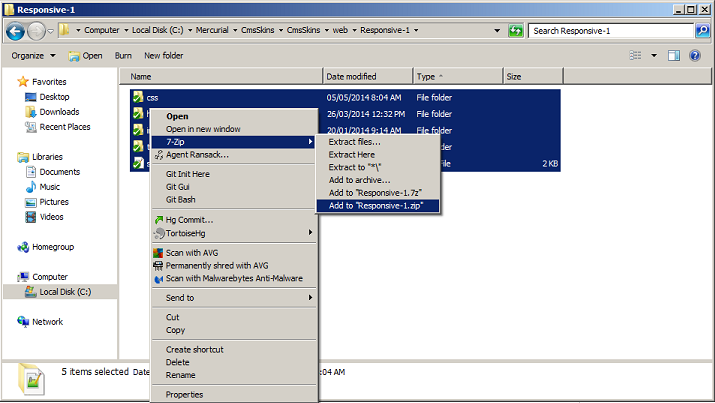
After this is done, zip up your skin, and upload it to the Deployment Manager. When you zip up the skin, make sure you do so from inside the skin directory, like the following image:
Note: Please do not name your zip file 'responsive-1.zip'. This is just an example. Please use '<your name>-<skin name>.zip'. For example, if your name is "John Smith", and your skin name is "Mystery", then you would name your zip file 'johnsmith-mystery.zip'. While you are working on a skin, please use the same file name throughout your process.
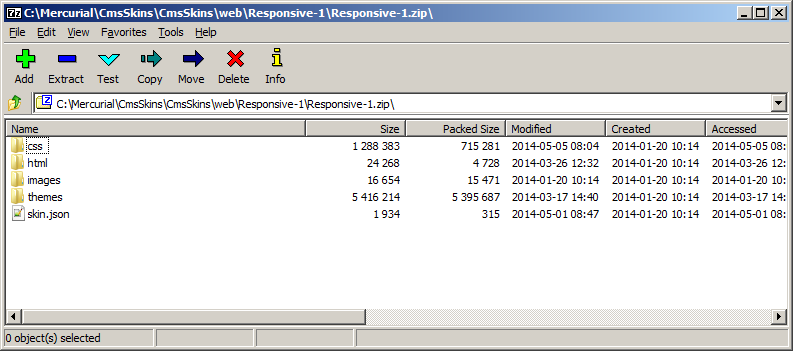
The resulting zip file should look exactly like the following when opened (except your directory and zip file name should be different):
In the Deployment Manager, update your assigned site to use your newly uploaded skin.
Now, whenever you have updated the skin and wish to see the results, you just need to upload an updated zip file. The results will be immediately visible on your assigned site.
Images
In this step, you will download or extract any images that are present in your source design (PSD or web page), and save them to a directory for future use.
Fonts
In this step, you will want to examine your source design and determine what fonts are needed. Download the required fonts, use FontSquirrel to convert them into the appropriate formats, and move the fonts to the '/css/fonts/' directory. Copy the CSS for the fonts to the top of the '/css/skin.css' file.
The base template comes with several fonts included. Use these as an example when adding new fonts. Please remove any unused fonts before submitting your skin for review.
Basic Layout and Placeholders
From here, you will likely want to update your skin to have a layout that roughly matches your assigned design. Use the various layout classes defined in '/css/layout-styles.css' to assist with this.
Next, you should also add any placeholders that were given to you with your instructions. There are several example placeholders in the base template that you can use as a reference.
After that, you will want to copy any images that are part of the main design (i.e. not inside placeholders), to the '/css/images/' directory. You should then update your '/css/skin.css' file to use these images.
Next, upload your updated skin to the Deployment Manager.
Adding Site Content
After you have updated your skin in the Deployment Manager, you will want to log into the admin panel on your site. Do so by clicking on the 'admin login' link located at the bottom of your site. Log in with the credentials you were given when you were hired.
From here, you will want to use the design editor and page editor to make your site match your source design as closely as possible. You will likely need some of the images from the 'Images' step above when doing this.
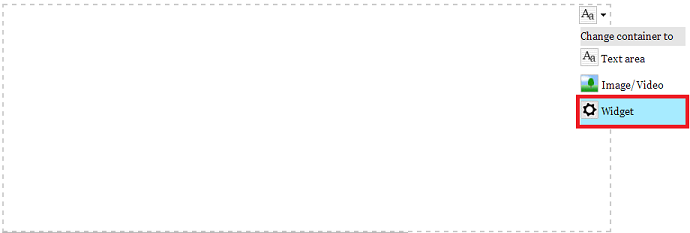
In the page editor, you will also want to add both a horizontal and a vertical death record listing, so that you can style these properly. To add a death record listing widget in the page editor, first add a content row, and change its type to 'widget':
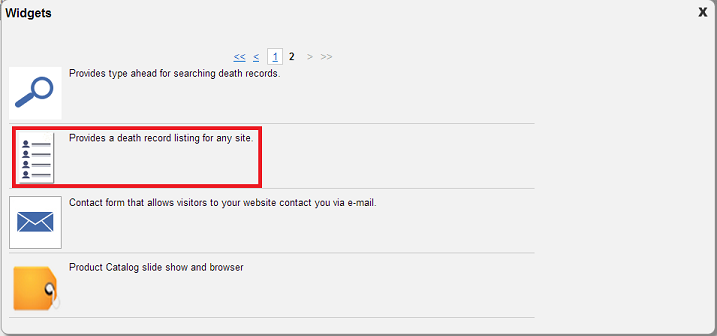
Then select the death record listing widget:
After you are done making your changes in the site editor, press the 'publish site' button. After this, your site should be updated with your changes.
Note: Feel free to experiment with the site editor to get a feel for how things work.
Editing Your Skin
After you have populated your site with the necessary content, you will want to view your site and start adjusting your skin to more closely match the source design. You will likely have to go through several iterations of editing your skin and uploading your changes to the Deployment Manager before you are done with this step.
It is highly recommended that you use the developer tools in Chrome or Firefox to prototype your changes.
Final Checklist
The skin is now almost complete. Please verify that your skin meets the following requirements before proceeding:
-
Your site should match the source design as closely as possible
- Both home pages and inside pages should look correct
- All placeholders given to you with your instructions should be present
- Your site should look aesthetically pleasing at any horizontal resolution above 340px
- The dropdown navigation menu at the top should be replaced with a dropdown button below 1024px
- Multi-column content should be change to single-column, full-width content below 768px
- Both horizontal and vertical death record listings should look good
-
If the skin uses a banner at the top of the page, make sure the banner matches the height in the source design
- You may have to use JavaScript to clip the banner while maintaining a proper aspect ratio
-
Edit panes for placeholders should have minimum heights and widths set, where necessary
- Open layout-styles.css in your base template, and look under the '/* Website Editor */' section for examples of this
Once you have verified the above items, produce a preview image and a thumbnail for your skin, and place them into the '/themes/previews' and '/themes/thumbs/' directories, respectively. Ensure the 'skin.json' file points to these.
Send the Skin in for Review
Once you have completed the above step, zip up your skin and send it to us for review. Zip up any images you used to populate your placeholders, and send us that as well. We will review the skin, and tell you if any further modifications are necessary.
Once your skin clears review, you are done.